More
referral
Increase your income with Hive. Invite your friends and earn real cryptocurrency!

1660s Hynix 37mhs

Very weird! Mine are all 1660s so I had no problem finding the correct indexes. I think you are using the wrong one!

would you please use the command nvflash -a ou nvflash --list and paste the result?

EDIT: The command might be nvflash_linux --list ou -a cuz of OS

Vini I just swapped this into a Windows box and ran the update. If I get more than 15 min into something and I know another 10 will fix it for sure, I go that route. I’m old.
Anyway, nice little upgrade.
Since during this trial phase it’s replacing the 3070 in my main workstation, we’ll see how it goes.
Right now, set to Core 0, Mem +1200 (Windows 10).
35.7 Megahash at 85 Watts. Nice little 3 megahash bump at the expense of 15 watts. Would make that deal every time.
I really appreciate all your help sir!

1 Like

Vini’s method works.

If you’re using wget and Google Drive, you will need to follow these steps: Download Google Drive Files using wget | by Anjan Chandra Paudel | Medium

The three cards posted below are identical, the first one has the modded BIOS:

This method is very convenient if you don’t have time to take out the card from your rig and move it to a Windows box just to mod the BIOS.

1 Like

STEPS below courtesy of other posts above, @Vini in particular; I tried to make it a bit more newbie-friendly. There are more steps because of Google Drive (Part 1).

BIOS flash instructions for GTX 1660 Super (HYNIX CHIPSET ONLY) using HiveOS (use at your own risk):

Part I

  1. Download the Palit 1660 Super firmware (check mega link at the beginning of this thread)
  2. Rename the “Palit_GTX1660SUPER-6G-90.16.59.00.28.rom” file to “Palit_1660S.rom”
  3. Upload Palit_1660S.rom to your google drive
  4. On Google Drive, right-click on the file and choose “Get Link”
  5. Change “Restricted” to “Anyone with the link”
  6. Click on “Copy link” and then open Notepad and paste it there
  7. Copy the file ID from the link you pasted, for example “https://drive.google.com/file/d/1UibyVC_C2hoT_XEw15gPEwPW4yFyJFeOEA/view?usp=sharing” the file ID is “1UibyVC_C2hoT_XEw15gPEwPW4yFyJFeOEA” (you will use this on Part II, Step 7 later)
  8. Go to HiveOS and then go to “Cards” and download the vBIOS rom of your Colorful 1660 Super (this will be your backup)

Part II

  1. On HiveOS, stop the miner (click “Miner Actions” on top then choose “Stop Miner”)
  2. Go to “Settings” on your worker scroll down to “Maintenance mode” and change it to “Without loading drivers”
  3. On “Power Actions” choose “Reboot”
  4. After it boots up, click “Remote Access” and choose “Hive Shell Start”
  5. Log in as “user”, password is “1” (this is the default)
  6. Type “cd /hive/sbin”
  7. Type “wget --no-check-certificate ‘https://docs.google.com/uc?export=download&id=FILEID_from_PART1_STEP7’ -O Palit_1660S.rom” (please read Step 7 from Part 1 of this guide)
  8. Type “sudo nvflash_linux -i? -6 Palit_1660S.rom” replace the question mark on the command with the GPU number of the card you want to BIOS mod, for example for GPU 1 the command should be “sudo nvflash_linux -i1 -6 Palit_1660S.rom”
  9. You will be asked to confirm so choose “y”
  10. Go back to HiveOS Dashboard, go to worker settings and choose “Disable” on “Maintenance mode”
  11. Reboot your rig using Power Actions
  12. After rebooting, go back to the worker overview and change your OC settings to Core Clock: 1050 Mem Clock: 2300
  13. You should now be getting at least 34-35 MHs on your 1660 Super.
  14. If your card loses temp and fan data, lower mem clock by 100 then reboot; keep doing this until you get to a stable state where the temp and fan data doesn’t disappear (you can also go the opposite direction and keep adding in increments of 100 to the mem clock to get to a better sweet spot)
5 Likes

All three above have been flashed to the Palit rom. All of the above are Colorful Battle-Ax 1660 Supers. It’s a shame the one in the middle doesn’t seem to be able to go any further but I am able to run this non-stop for 24 hours without needing a miner restart or a rig reboot.

Interestingly, MUtl on the miner console doesn’t seem to go past 100%, while the 3rd card can’t go past 1005 on core clock (photo after reboot):

1 Like

Hello, something curious, in my country there are youtubers questioning the amount of MH reported for effective MH, and that for EXAMPLE a 1660s with MC 2100 doing its 32.30mh this would make LESS valid shares… than a 1660s with MC 1750 (which is natural for her if we look at techpowerup) doing her 31.22mh, look I’m doing the tests, measuring every 24 hours at exact times, it requires a few days, but I’m having better results with less mh, less effort on the memories .
Can anyone opine about it here?

Do you with palit bios, in addition to more reported MH, can you see more EFFECTIVE SHARES?

Hi, you who use Nbminer, watching for long hours, can you print this same screen? So that we can observe the effective shares of your cards 35.17mh / 32.50mh / 34.09mh
… if possible put one of your cards with mcc 1750 only, with pl 125
In your print we see little time of use, both with 7 shared accept…

In my case here I see better performance with less effort on memories
Ty

I get the same accepted ratio percentage as before, about 98.4 to 99% (accepted vs rejected, 0 invalid shares).

I’ve only had one full day using the Palit bios so maybe the numbers might change in the coming days.

I feel sad I just found this 1660s bio flash after a month, own 6x 1660s and waste about a month for a free hashrate boost :_____(, I will post my result below after the whole night test 2 days ago.

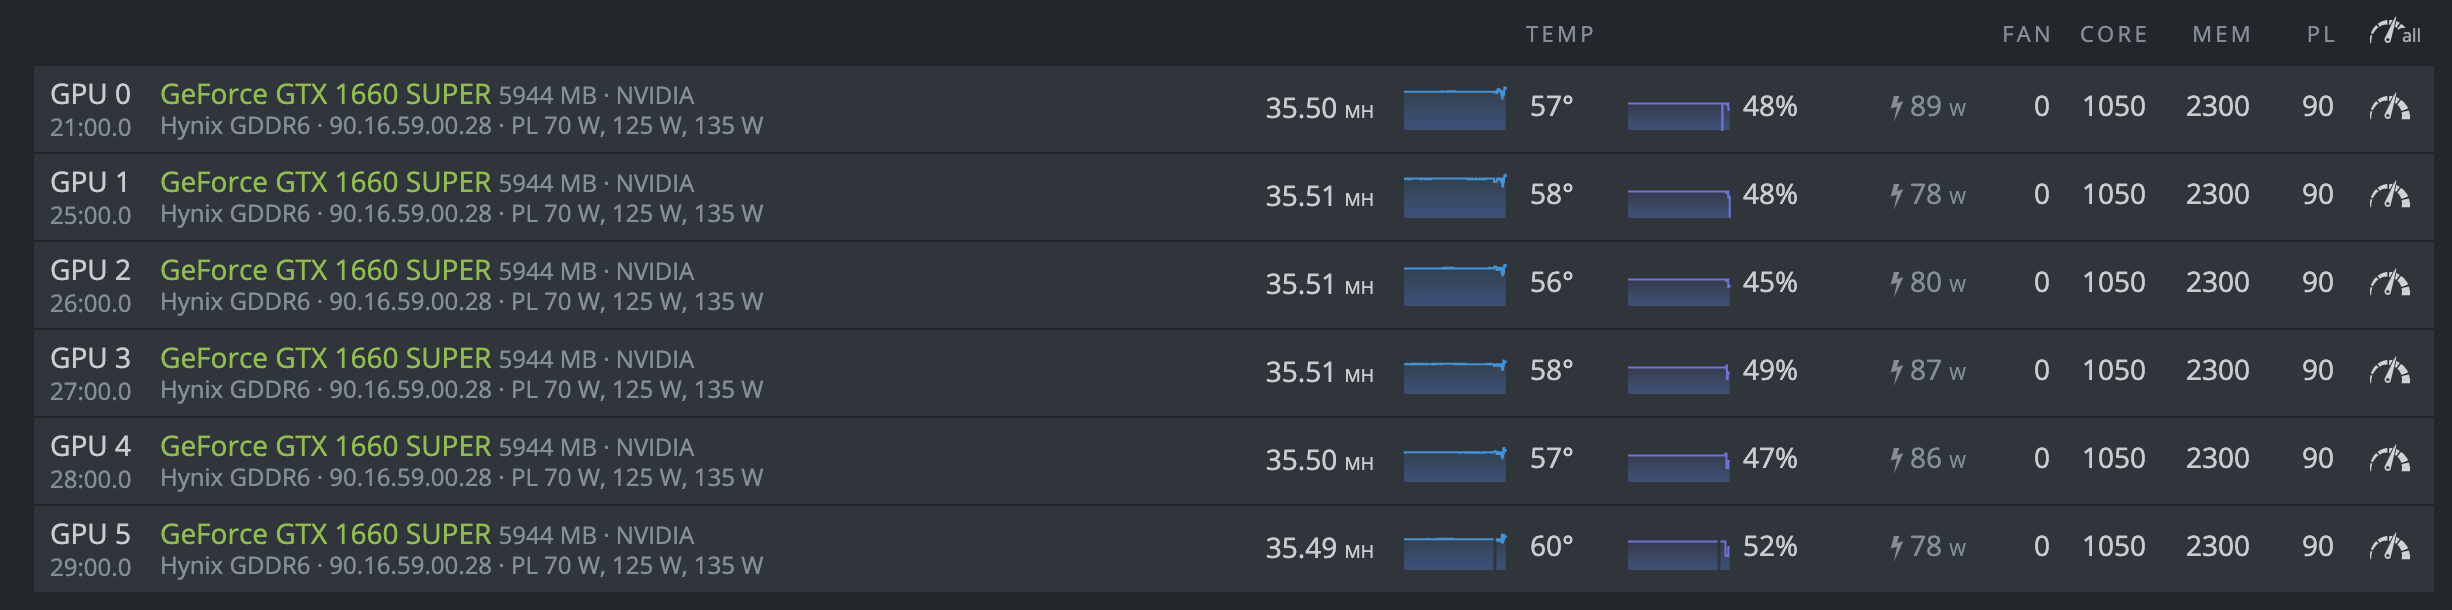
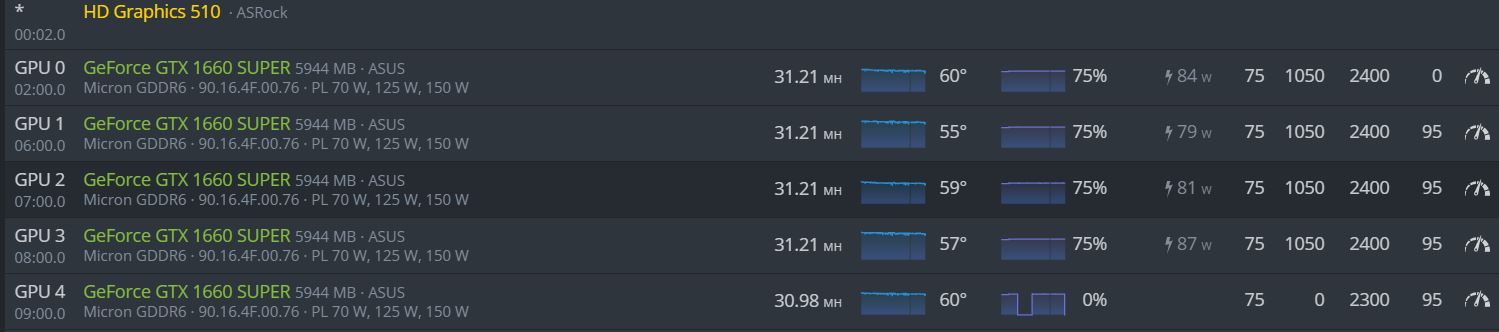
I flashed palit bios to 1 msi 1660s and 5x asus 1660s, all of them are hynix memory that runs negative overclock setting before, the maximum hashrate before is about 31.8. After the pailt bios flash on all card, my version of 1660s are able to stable close at 35.8, although two of them lost their power and fan speed displaying, but their fans are both working on the rig. I did test some higher memory setting on 2600 even 2700, they can reach as the topic 37 at short time and 36 for about 30m - 1h, which still aren’t very stable, probably depends on the 1660s’s condition.

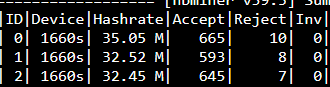
I mainly use gminer and I do remember the t-rex provides approx the same hashrate output as the current gminer. My previous test was setting all of them running around 36.2 but hiveos report error on 4x 1660s with missing hashrate and overclock setting.

So my final test result as shown in the screenshot, as a reference to other miner :slight_smile:

Before flashing the vbios, make sure to turn on the maintenance mode on “without loading driver” and reboot, then flash the vbios on the “overclocking” tab once and reboot. Also make sure backup your previous bios version just in case to roll back to its original.

hi i have the same problem like mljtheshield

Adapter: Graphics Device (10DE,21C4,1043,8787) S:00,B:12,D:00,F:00

EEPROM ID (EF,6014) : WBond W25Q80EW 1.65-1.95V 8192Kx1S, page

EEPROM ID (EF,6014) : WBond W25Q80EW 1.65-1.95V 8192Kx1S, page

WARNING: Firmware image PCI Vendor ID (0000)
does not match adapter PCI Vendor ID (10DE).
WARNING: None of the firmware image compatible PCI Device ID’s
match the PCI Device ID of the adapter.
Adapter PCI Device ID: 21C4
Firmware image PCI Device ID: 0000
WARNING: Firmware image PCI Subsystem ID (0000.0000)
does not match adapter PCI Subsystem ID (1043.8787).
WARNING: None of the firmware image compatible Board ID’s
match the Board ID of the adapter.
Adapter Board ID: 01B2
Firmware image Board ID: 0000

NOTE: Exception caught.
Nothing changed!

what command should i put to force it?

image

Accepted shares: 1903
Rejected shares: 25

Results in 98.7%, not at all different from what is was before the BIOS flash.

1 Like

Is there any chance of a change bios in the hive os in case erros like that?:

WARNING: Firmware image PCI Vendor ID (0000)
does not match adapter PCI Vendor ID (10DE).

? am I forced to windows?

Thank you for that very good observation.

I plugged in a KillAWatt meter to check on a rig rebuild and noted what you said about the PL in software not being true. Regardless of Palit or MSI bios MOD I am seeing 70-80W from “the wall” which is what we want even though software reports 85-90w for MSI and 125w for Palit with PL 0.

I have the PNY single fan model so am not sure if others experience the same or if PL actually adjusts voltage at the wall for their model.

1 Like

This is good news.

Btw, I have seen slightly better efficiency when I put a 120 sec delay in the OC settings. I rarely seem to go below 99% when just yesterday I was usually in the 98% range.

Might be nothing but you guys might want to test this theory out too.

I had not idea that was something to look into. TRex has a command line option recommended for 30xx on certain algos like ETHASH, ProgPOW, Octopus so it must be an issue big enough to warrant a try.

I was having an issue with stales on the HIVEON pools over the past several days where latency was good, but confirms were jumping around from double to triple and quad MS. It seems to have calmed down but I thought that was the stales culprit.

One thing for sure, this 1660S bios mod must have had an affect on sales because I picked up a few cards at Best Buy a few weeks ago that the sales person said were gathering dust and since then their shipments seem to disappear pretty quickly.

got a few msi 1660 super with bios 90.16.4F.40.AC. is it new?!?! can i put the other msi in them?

Hi,

I’ve updated my ZOTAC 1660 SUPER AMP rig with Palit BIOS. The results are below :slight_smile:

All stable!

any setting for asus tuf 1660 super ???

Has anyone done the test before and after up to 35mhs bios??
Shares sharing has improved.

Alguem ai jĂĄ fez o teste antes e depois de up a bios de 35mhs ??
Se melhorou os compatilhamentos de shares.

HI I have cards which are 5942 and not 5944 MB, PALIT vbios do not work here. MSI works, but it does not do much improvement. Anyone have hynix vbios for 5942 which can achieve 34 mhs+?