


[center]HiveOS VPN Setup[/center]
First of all you need to have a PC or a Server that needs to have a fixed IP on the internal network (the network where you host the VPN Server). Please remember that all VPN traffic will go to the VPN Server machine coming from each VPN client (each of your RIG’s and yourself at your personal computer).
I’m assuming you already have installed your VPN Server software at your Windows or Linux.
Please note that OpenVPN 2.4 installers will not work on Windows XP
If you use, for example, Debian, to install OpenVPN just type:
apt-get install openvpn
with this you get the Devian OpenVPN package that you will use to setup your OpenVPN server and generate server and client keys.
Links to download OpenVPN and install it manually at the time this tutorial was written:
Linux:
https://swupdate.openvpn.org/community/releases/openvpn-2.4.5.tar.gz
Windows:
https://swupdate.openvpn.org/community/releases/openvpn-install-2.4.5-I601.exe
Configuring:
First we need to create the CA certificate.
To do this use the following commands:
If you are using Linux, BSD, or a unix-like OS, open a shell and cd to the easy-rsa subdirectory. If you installed OpenVPN from an RPM or DEB file, the easy-rsa directory can usually be found in /usr/share/doc/packages/openvpn or /usr/share/doc/openvpn (it’s best to copy this directory to another location such as /etc/openvpn, before any edits, so that future OpenVPN package upgrades won’t overwrite your modifications). If you installed from a .tar.gz file, the easy-rsa directory will be in the top level directory of the expanded source tree.
At Debian, if you did “apt-get install openvpn” execute the following commands:
1:	make-cadir my_ca
2:	cd my_ca
3:	pico vars
If you are using Windows, open up a Command Prompt window and cd to \Program Files\OpenVPN\easy-rsa. Run the following batch file to copy configuration files into place (this will overwrite any preexisting vars.bat and openssl.cnf files):
init-config
Now edit the vars file (called vars.bat on Windows / at Linux use the “pico vars” command) and set the KEY_COUNTRY, KEY_PROVINCE, KEY_CITY, KEY_ORG, and KEY_EMAIL parameters. Don’t leave any of these parameters blank.
Set KEY_SIZE to “4096”
Exit and save “vars” file.
At Debian, if you did “apt-get install openvpn”, run this command:
cp openssl-1.0.0.cnf openssl.cnf
Next, initialize the PKI. On Linux/BSD/Unix:
source ./vars
./clean-all
./build-ca
On Windows:
vars
clean-all
build-ca
Next, we will generate a certificate and private key for the server. On Linux/BSD/Unix:
./build-key-server server
On Windows:
build-key-server server
As in the previous step, most parameters can be defaulted. When the Common Name is queried, enter “server”. Two other queries require positive responses, “Sign the certificate? [y/n]” and “1 out of 1 certificate requests certified, commit? [y/n]”.
Generate certificates & keys for 3 clients
Generating client certificates is very similar to the previous step. On Linux/BSD/Unix:
./build-key client1
./build-key client2
./build-key client3
On Windows:
build-key client1
build-key client2
build-key client3
Remember that for each client, make sure to type the appropriate Common Name when prompted, i.e. “client1”, “client2”, or “client3”. Always use a unique common name for each client.
Generate Diffie Hellman parameters
Diffie Hellman parameters must be generated for the OpenVPN server. On Linux/BSD/Unix:
./build-dh
On Windows:
build-dh
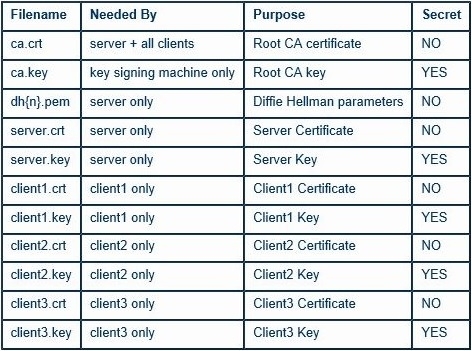
Key Files
Now we will find our newly-generated keys and certificates in the keys subdirectory (my_ca/keys). Here is an explanation of the relevant files:
The final step in the key generation process is to copy all files to the machines which need them, taking care to copy secret files over a secure channel.
Execute the “su” command to get root access.
Execute the following command when you are at “my_ca/keys” dir:
cp ca.crt server.key server.crt dh4096.pem /etc/openvpn/server/
Your “server.conf” file will be placed at Linux here:
/etc/openvpn/server.conf
And it will look something like this:
port 1194
proto udp
dev tun
ca server/ca.crt
cert server/server.crt
key server/server.key
dh server/dh4096.pem
topology subnet
server 10.200.200.0 255.255.255.0
ifconfig-pool-persist ipp.txt
client-config-dir ccd
client-to-client
keepalive 10 120
comp-lzo
persist-key
persist-tun
status openvpn-status.log
log openvpn.log
verb 3
Create the “server.conf” file at “/etc/openvpn/” using this command:
cat > server.conf
Then copy all the configuration above, at the end of the file press “CTRL-C” and the “server.conf” will be created.
Create the following directory:
mkdir /etc/openvpn/ccd
Run OpenVPN server like this at: /etc/openvpn/
openvpn server.conf
Your OpenVPN server should be running with no errors.
OpenVPN server should be running after booting and running if you used Debian package install, if not or manually installed, you need to get “openvpn server.conf” at the initscript.
For the “client.conf” file you need to upload to HiveOS website:
client
dev tun
proto udp
remote dyndns.name.here.org 1194
resolv-retry infinite
nobind
persist-key
persist-tun
remote-cert-tls server
comp-lzo
verb 3

<ca>
-----BEGIN CERTIFICATE-----
***Paste CA Cert Text Here***

-----END CERTIFICATE-----
</ca>

<cert>
-----BEGIN CERTIFICATE-----
***Paste Your Cert Text Here***

-----END CERTIFICATE-----
</cert>

<key>
-----BEGIN PRIVATE KEY-----
***Paste Your Cert Private Key Here***

-----END PRIVATE KEY-----
</key>
Where ca it’s your “ca.crt” , cert it’s your “client.crt” and key it’s your “client.key” content. You need to copy and paste each of this files content into those 3 fields.
Here at “remote dyndns.name.here.org 1194” line, if you have a dynamic IP Address, it’s better if you get some DynDns Service, get a dynamic dns like “dyndns.name.here.org”, set it at your local router at DynDns settings so the router update your dynamic IP Address automatically.
Edit the remote directive to point to the hostname/IP address and port number of the OpenVPN server (if your OpenVPN server will be running on a single-NIC machine behind a firewall/NAT-gateway, use the public IP address of the gateway, and a port number which you have configured the gateway to forward to the OpenVPN server).
To check client’s service status on the rig when you upload config and it’s not working:
systemctl status openvpn@client
journalctl -u openvpn@client -e --no-pager -n 100
Finally, we can now setup and configure our OpenVPN client at our PC or Laptop.
Just install OpenVPN Client and use the same “client.conf” file, but rename it to “hiveosvpn.ovpn” if you are using Microsoft Windows.
Copy it to your OpenVPN install dir under the sub dir called \config\ and get it there.
Launch OpenVPN Client for your Windows and your done, connect to the OpenVPN Server and you are at the same network as your remote rig’s.
[center]Happy Mining with HiveOS Power![/center]